 |
| 15APR2015 - You can see the chimney is now framed and the clerestory is almost completely framed in |
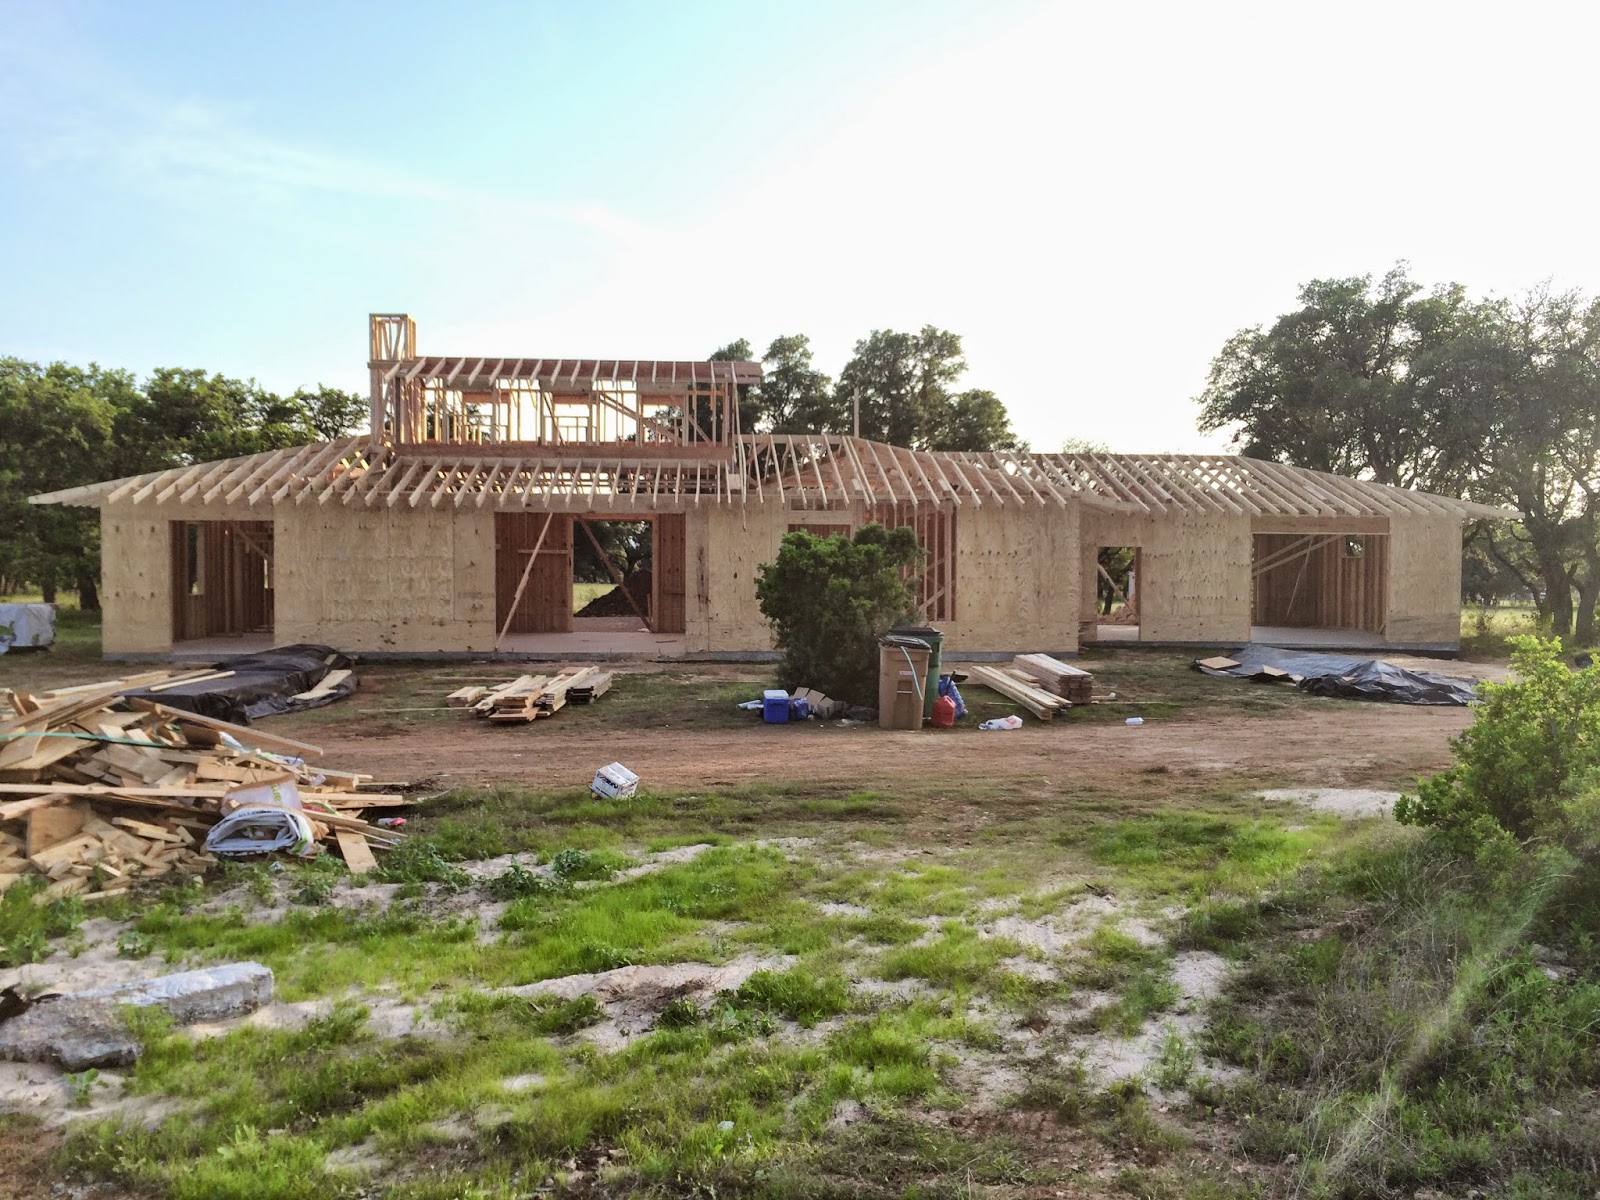
15APR2015 - This is nice view of the back of the house.

15APR2015 - This is view from the front of the house into the courtyard.

15APR2015 - This shows a side view from the east.

15APR2015 - This shows the the largest beam in the house (7.75" x 18" 5 ply LVL). It spans the Living Room front to back.

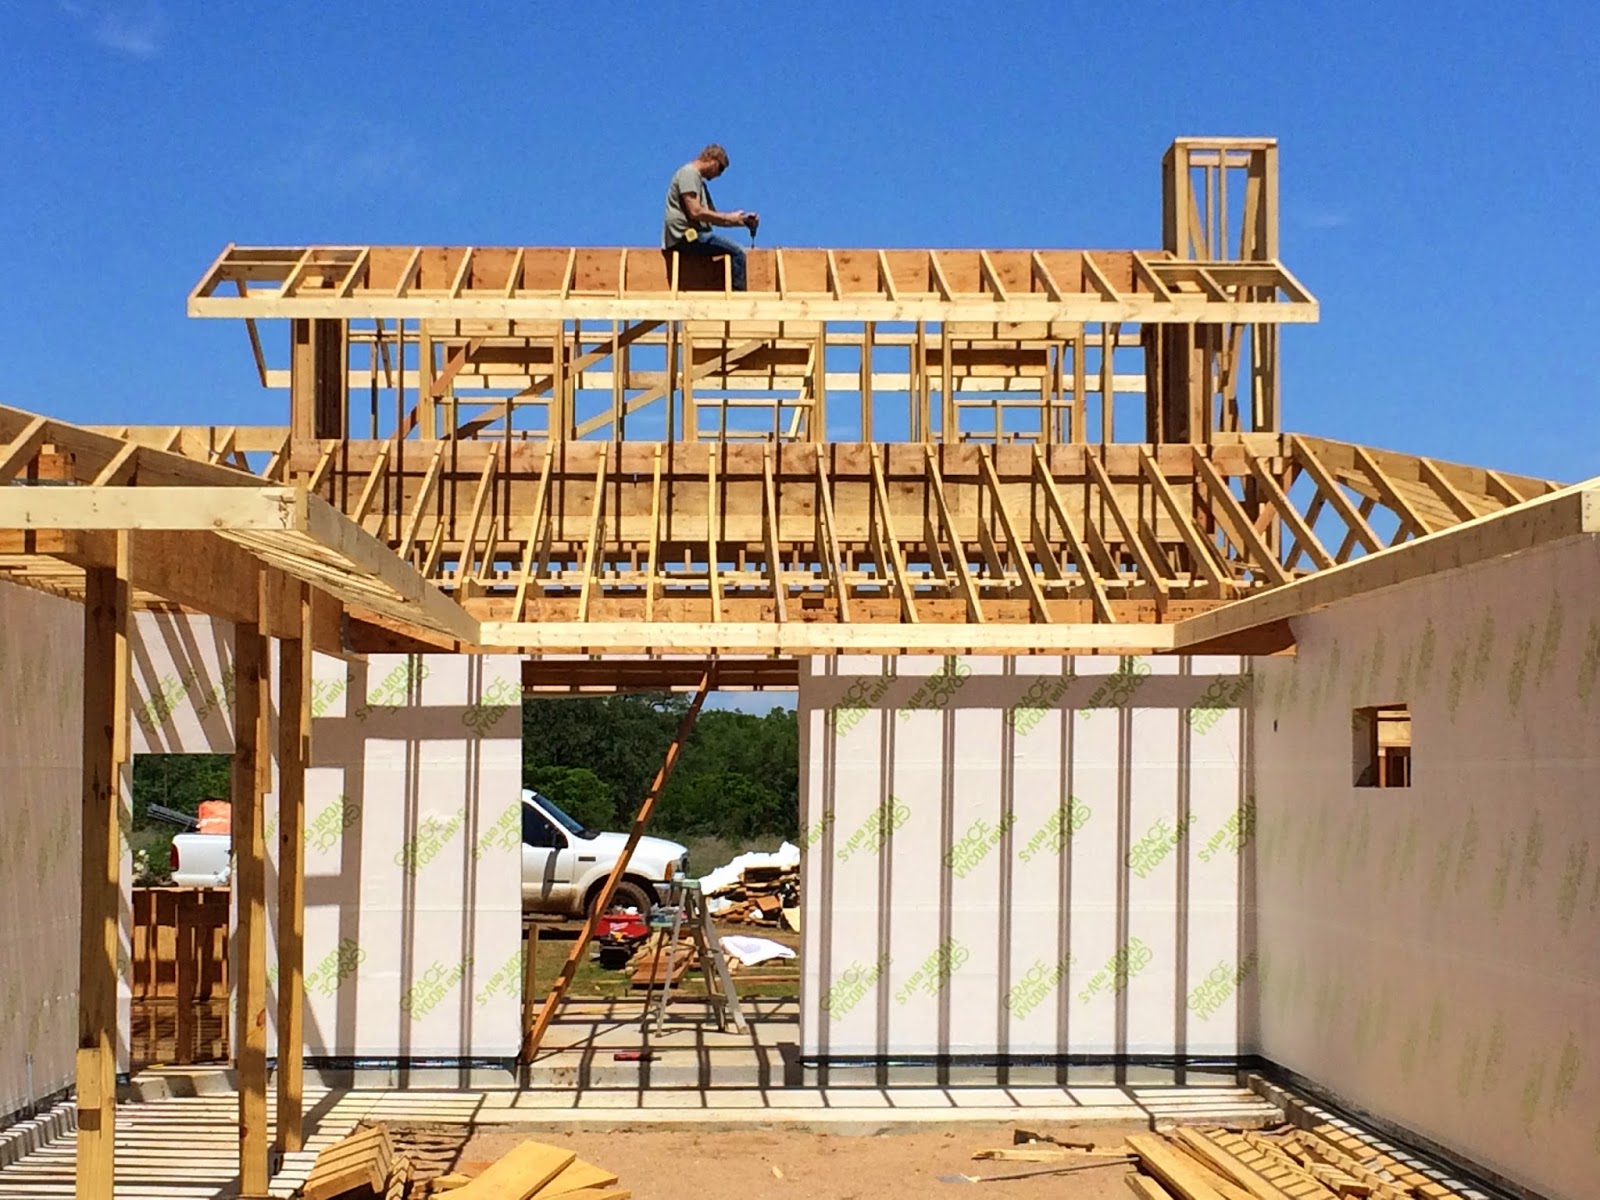
15APR2015 - This is the clerestory above the Living Room that contains 2 parallel beams that the largest beam is supporting.

15APR2015 - Here is another view of the large beam.

15APR2015 - The large beam dead-ends just above the front door.

15APR2015 - Here's a better view into the clerestory above the Living Room.

15APR2015 - This picture shows how the Main beam supports the clerestory.

15APR2015 - These are the exposed beams over the patio in the courtyard. The front door is to the lower left.
 |
| We used a new product manufactured by Grace for our house wrap. It's called Vycor enV-S. It provides several benefits over products like Tyvek. In addition to providing a water and air barrier, Vycor enV-S is self-adhering.
This means you don't have to use a staple gun to puncture your air
barrier with thousands of holes just to make it stick on the wall that
you want to seal up. Vycor enV-S also seals around nails driven
into it (when you go to apply your siding). I think what I like most
about the product is that I don't have to listen to it rattling in the
wind. I see this on almost every house that I visit. The house wrap has
loosed and is constantly flapping in the breeze, making all those tiny
holes larger and the house wrap ineffective. |
 |
| 18APR2015 - TJ Contractors wrapped the house with the Grace Vycor enV-S house wrap. This is a view of the courtyard. |
 |
| 18APR2015 - This is the view from the driveway. |
 |
| 18APR2015 - The house wrap extends all the way around the house now. |
 |
| This is Cassidy (one of our 2 dogs) helping me out. |
 |
| 19APR2015 - Time to install some hidden wiring for the ceiling fan in the Living Room. I didn't want the wiring to be exposed, so I'm running it along the top of the beam prior to the roof decking. The wiring is run through a flexible waterproof metal conduit called SealFlex, so it's protected from the elements and the nails. |
 |
| 19APR2015 - Here's a nice shot of me drilling the hole through the 18" beam. |
 |
| 19APR2015 - While I was up there I decided to take a panorama of all the rafters. |
 |
| 19APR2015 - ...and a selfie! |
 |
| 19APR2015 - Here's a picture of the SealFlex conduit that I'm installing. I will have the roofer make a special cap along the ridge of the roof, in case I need access later. |
 |
| This
is the Carlisle Elastoform Flashing Tape that we used to create sill
pans for the windows and to seal around some of the wall penetrations. This is a really tough 90 mil (almost 1/8") product that will stick to anything. Watch your fingers! |
 |
| Here is the boot for the Air Conditioner refrigerant lines. It has a large flange that can easily be sealed to the house wrap and provides a rubber gasket (inside). That creates a nice seal around the piping and electrical wiring. Keeps the air and bugs out. |
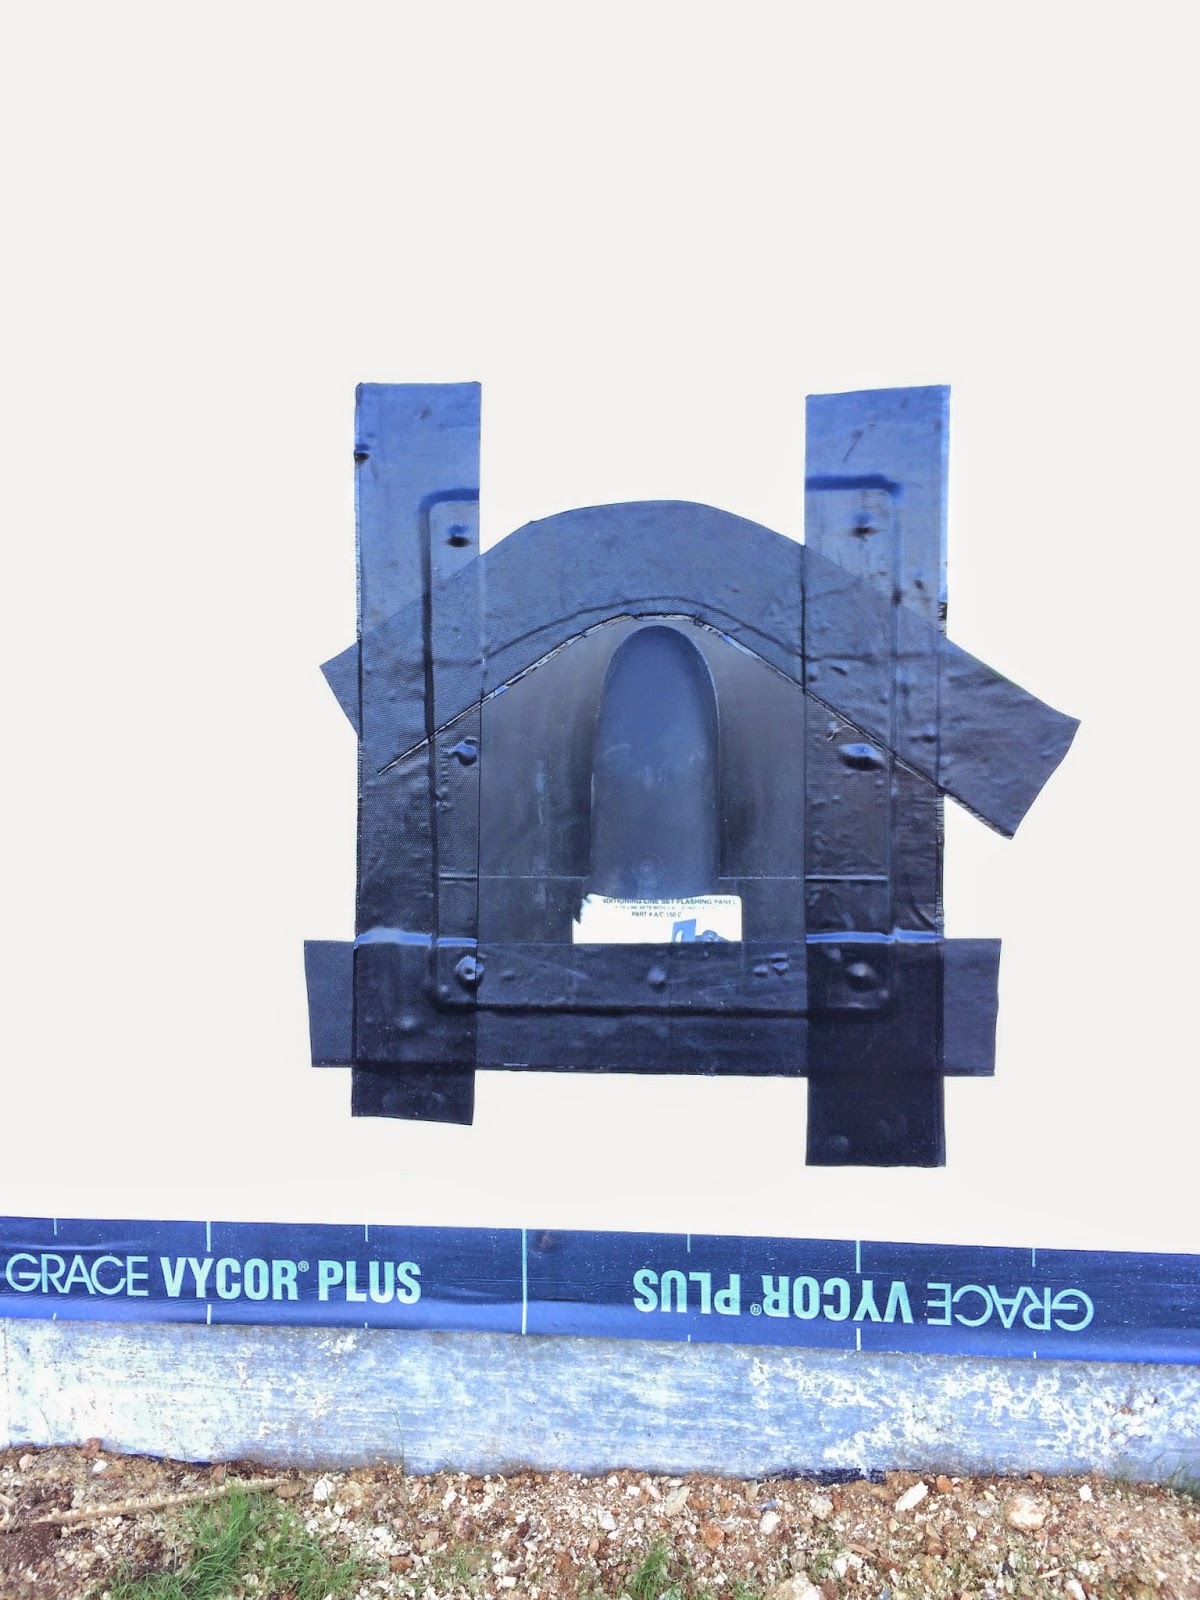 |
| 19APR2015 - This is another shot of the A/C Boot. I may have gone a little overboard using the tape to seal it up. |
 |
| 19APR2015 - Here's one of the window sills flashed with the Carlisle Elastoform flashing. |
 |
| 19APR2015 - You can see that this provides an excellent seal and weatherproofing for the windows sills. You can also see the outline of the plastic corner pieces used to provide and extra layer of protection beneath everything. Good Stuff! |
 |
| 20APR2015 - TJ Contractors came out and decked the entire roof in one day! They did an awesome job. |
 |
| 20APR2015 - Here is another shot of the back of the house. |
 |
| 20APR2015 - This is a shot from the driveway. |
 |
| 20APR2015 - I decided to make a panorama of the front of the house. |
 |
| 21APR2015 - We used another Grace product called Tri-Flex to dry-in the roof. A big thanks to my Dad for coming out and helping me install it! Unfortunately, we ran short of materials and I had to order more. |
 |
| 22APR2015 - Alyson helped apply the last roll of Tri-Flex and we covered the rest of the roof with black plastic. Love those special roofing shoes! |
 |
| 26APR2015 - I spent most of Saturday and Sunday sealing the upper and lower areas of the house wrap to the top plates and concrete slab. It was a late night, so I decided to add some light to the house. |
Cor-A-Vent
 We are using a new technique to ventilate our Hardi board and batten siding. All fiber-cement based siding products are essentially masonry siding. They are porous and absorb moisture from direct contact with water/rain and through the air (vapor & humidity).
Using a product called Cor-A-Vent (which is corrugated plastic sheeting strips with bug screen integrated into it) allows us to fir-out the siding and provide ventilation for the back of the siding to help dry it out. This also provides an air-gap to prevent the water/moisture laden siding from contacting the house wrap. Even if rain water penetrated the siding, it would still need to somehow cross the 3/8" air-gap to even make contact with the house wrap. This further reduces the chance that moisture will enter the home.
When sunlight hits the drenched siding after a rain storm, the heat will vaporize any moisture in the siduing. this creates a vapor drive. This vapor will move toward drier areas. If the siding were against the house wrap, it would be driven into the wall. House wrap is normally very vapor permeable. Instead we have provided a ventilated air space. As the air becomes warmer, it wil rise creating convection and pull the moisture out of the wall system. this provides drier siding, less moisture drive into the wall and less chance for mold.
Technically, the air space also provide some R value to the insulation qualities of the wall.

07MAY2015 - Here is a picture of the lower continuous Cor-A-Vent strip at the bottom of the wall. (Bug screen faces down to keep the critters out). There are additional strips placed every 16" OC (over each stud) to provide the air-gap affect behind the siding.

07MAY2015 - This is one of the crew tacking up the Cor-A-Vent strips. It goes really fast and doesn't require many nails to tack them up.

07MAY2015 - Here a picture of the top of the siding. You can see the air gap at the top of the siding. It allows air to flow upward from behind the siding and then the soffit directs the air back downward behind the Freeze trim and thru the continuous top Cor-A-Vent strip. (Again, bug screen faces down to prevent the critters from getting in.)

07MAY2015 - Here's a picture of the garage with the siding installed.

08MAY2015 - The windows go in before the siding goes on. This is the front of the Master Bath.

08MAY2015 - The windows are going into the front of the office.

08MAY2015 -This shows the east side of the house and the Cor-A-Vent has been installed and the siding is going over it.

08MAY2015 -A closer shot. Notice you can see the top air gap to allow the moisture and air to escape.

08MAY2015 -The back of the house has the siding installed. The clerestory is not done. The crews are waiting on me to install metal roof flashing that needs to be installed prior to the siding.

20MAY2015 - I installed the metal roofing flashing along the bottom of the clerestory. Now, the clerestory has siding.

20MAY2015 - The courtyard has siding installed, but is missing trim work.

20MAY2015 - Another shot of the courtyard.

20MAY2015 - Another shot of the courtyard.

24MAY2015 - The doors arrived! Actually, I had to make a trip to Houston to go get them.
We were told that the doors had a 3 week lead time, but what they didn't tell us is that the doors would be 3 weeks late. The doors took 6 weeks to arrive!
This shows the front door and one of the interior doors. (unstained of course).

_________________________________________________________________________________________________
ALERT!!!
25MAY2015 - The Cornice Crew that installs the
siding was caught not installing doors and windows correctly and they were not fixing some framing issues correctly. They had been sub-contracted by the Framer to finish out the "Punch List" of
final framing changes on the house. Cecil (the Cornice Guy) mentioned that they were not too happy about this. This turned out to be more complicated that they (or myself thought) due to the framing crews deviation from the engineered framing plan.
There was also an engineering issue with the large double sliding glass door and transom windows. The framer did not want to take responsibility for installing the transom windows above the doorway without an adequate header. His definition of an adequate header was a double 2x12, which left no room for the transom windows. So, we asked them to leave. _________________________________________________________________________________________________
30MAY2015 - The fireplace was installed! Yay!
I found this really nice all masonry 42" fire box at Webco of Georgetown, Tx. This was a turnkey deal. they installed everything in 1 day.

30MAY2015 - A closer look inside at the brick pattern.

10JUN2015 - Here is a pic of the Dryer Box which prevents the dryer hose from becoming crushed and recesses the dryer against the wall. I also installed the OxBox washer drain and hot/cold water valves. The OxBox valves include a water hammer arrestor on each valve to prevent the "thud" or water hammer effect from the washing machine.
Originally, we were going to vent the dryer thru the roof, so I ordered some special 45 and 90 degree elbows to accomplish that. The elbows are special "no penalty" elbows. Each standard elbow in a venting system has a "penalty" of 5 to 10 feet. Dryer vents should be no longer than 50 feet (depending on your appliance manufacturer). So, to escape this "penalty" I ordered some special elbows.
Luckily, we found another way to vent the dryer through the side of the house with fewer turns and I decided to go ahead and use the special elbows anyway to prevent clogs and smoother venting.

10JUN2015 - I needed to come up with an method that would allow us to install the transom windows above the double sliding glass door and the french doors in our living room. I decided to build a couple of engineered "Fitch Headers".

10JUN2015 - These are basically, 2x6s with a piece of 1/4" steel plate sandwiched
and bolted together. Based on the several calculations of my own and
verification thru an engineering company, this header would be more than
adequate to support the transom windows and provide enough room to
allow the transom windows to be installed.

11JUN2015 - The "Fitch Header" is installed and the transom windows are going in. That beam was extremely heavy!
A big thanks to my Father-in-law for helping me on that one.

12JUN2015 - I finished installing the transom windows.
Please don't look at the spray foam oozing out. What a mess. I'm gonna have to clean that off carefully now.

12JUN2015 - Here's another shot of the transom windows. I think they look pretty nice.

12JUN2015 - The Cornice crew didn't install the kitchen window because it had to be re-ordered due to incorrect sizing.
Here, I have installed the window and started taping the flanges to the house wrap.

12JUN2015 - The kitchen window is installed and the siding and trim completed.

12JUN2015 - I started installing the stained tongue-n-groove soffit over the porches in the courtyard.

12JUN2015 - A few more boards nailed up.

12JUN2015 - I trimmed around the can lights and ceiling fan. Almost complete.

13JUN2015 - This is where the french doors and transom windows are going.

13JUN2015 - The "Fitch Header" over the doorway and transom windows are installed.

14JUN2015 - The french doors and exterior trim are installed.

14JUN2015 - This is a pic of the Master Bedroom french doors along the side of the courtyard.

14JUN2015 - I rounded the corners of the ledges. You won't get that kind of forethought from just any builder.

14JUN2015 - Here's a pic of the front door opening before I installed the door.

14JUN2015 - Here's the front door and exterior trim installed. Yay!

02JUL2015 - We hired Tammi Travis with Native Texan Paint Company to paint the exterior. She's actually one of our neighbors.
02JUL2015 - They have primed the back of the house.
02JUL2015 - Another pic of the back of the house.
02JUL2015 - Another pic of the back of the house.
03JUL2015 - The courtyard is primed.
03JUL2015 - The courtyard now has the base color applied. Yay! Tammi is doing a great job!
It's starting to look really good.
Note: I had to hold off on completing the stained T-n-G soffit while the painters did their work.
03JUL2015 - This is a test piece of the logs that we are planning to stain. The logs will be used for columns in the courtyard. I think the color and character of the logs came out really great.
Now, we are waiting for the exterior painting to be completed, so that roofing can begin! (06JUL2015).
|


No comments:
Post a Comment